Braised Cardamom Chicken

One of my favorite cookbooks is Raghavan Iyer’s 660 Curries — our family loves Indian food, and every single thing we have tried from the book has been pretty fantastic. I should note that the recipes aren’t all “curries” in the traditional Americanized sense, meaning they don’t all have heavy sauces. There’s a terrific array of rice dishes, for example.

One dish we have made again and again is Iyer’s Cardamom-Scented Chicken with Ginger and Garlic. And while it’s great as is, we have also branched out and used the same spices in other ways. Here I’ve adapted the recipe for an oven-braised version.

This recipe requires a trip to an Indian grocery store — if you have one nearby, it’s well worth a visit. You’ll find a ton of good quality spices in large quantities, usually at much lower prices than other stores, and a lot of them (cumin, cinnamon, cayenne, etc.) cross over into other types of cooking. And you’ll find stuff that’s hard to get anywhere else. (You can also shop online from a store like Kalustyan’s — I have not tried it, but it was recommended by The Kitchn.)

In particular, you’ll need some whole red chiles (spice level: medium to hot) and green cardamom pods:

img_2512

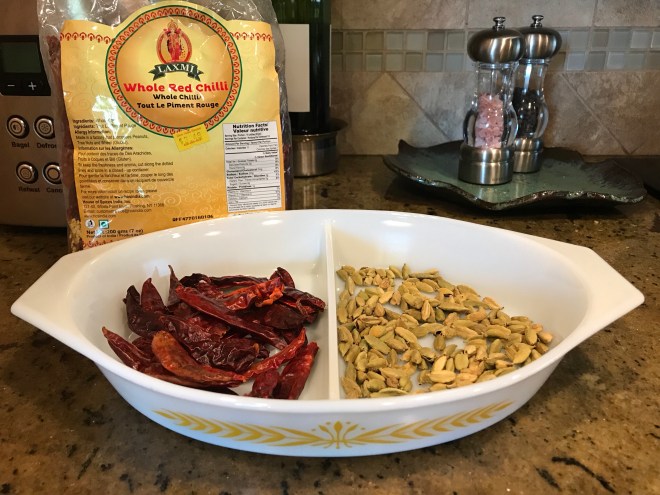
Cardamom pods are sometimes used whole, but for this recipe you open up the pods and extract the black seeds. Your reward for a few minutes of work is seeds that are much more pungent and aromatic, and they are one of the main flavors of the dish.

The recipe also calls for ghee, a type of clarified butter that you can buy from an Indian grocery or make yourself. Making ghee is super easy: Alton Brown has a recipe here on the Food Network website.

Serves 4

Ingredients

2 tsp whole cardamom seeds
6 whole Indian red chiles
2 tbsp fresh ginger, finely grated
1 1/2 tsp garlic, minced
1/2 tsp ground turmeric
1 tsp kosher salt
1/2 tsp canola oil
8 chicken drumsticks or mix of drumsticks and bone-in thighs, skins removed
1 tbsp ghee
3 bay leaves
2 whole cinnamon sticks
1 medium yellow onion, sliced
2 tbsp fresh cilantro, chopped

Grind the cardamom seeds with three of the chiles (a coffee grinder works best if you have one strictly for spices; otherwise you’ll need to start with ground cardamom, chop up the chiles yourself and grind with a mortar and pestle). Add the ginger, garlic, turmeric, salt and oil and stir to form a paste. Rub the chicken with the paste and marinate for at least two hours (preferably overnight).

Preheat oven to 375 degrees.

In a large oven-safe skillet over low heat, melt the ghee. Add the bay leaves, cinnamon sticks and remaining chiles. Top with the chicken and onions. Move the skillet to the oven and bake until the chicken braises in its own juices and reaches an internal temperature of 180 degrees and is almost falling off the bone, about 1 hour. Top with cilantro and serve.

Pictured: Corning Ware Spice O’ Life A-10-B Skillet, Pyrex Royal Wheat 063 Divided Dish

Roasted Carrots and Potatoes with Carrot Top Pesto

For a few Saturdays in a row, I’ve watched people flock to the carrots in the vegetable booth at our neighborhood farmers’ market — brilliant orange specimens, stubby, with a ton a fresh leafy greens attached. So this weekend, I bought them too. It was the perfect opportunity to make the carrot top pesto I’d seen in a Bon Appetit recipe, which I’ve adapted here.

Serves 4-6

Ingredients

1-2 lbs carrots with tops, trimmed and peeled
1 lb russet potatoes, partially peeled (about 2 large)
1/4 cup plus 2 tbsp olive oil
salt
pepper
1/4 cup (packed) fresh basil
1/4 cup (packed) fresh parsley
1 garlic clove, minced
1/4 cup grated Parmesan cheese

Preheat oven to 450 degrees. Move a rack to the top third of the oven.

Cut the potatoes into half-inch slices. If your carrots are skinny, cut into 2- to 3-inch chunks; if they are fat, cut on the diagonal into half-inch slices. Toss in 2 tbsp olive oil and spread out in an even layer on a baking sheet.

Roast until the carrots and potatoes are tender and browned, about 30-40 minutes.

In a food processor, combine 1 cup (packed) of the carrot tops (leaves and tender stems only), basil, parsley, garlic, Parmesan and 1/4 cup olive oil. Pulse until you have a coarse puree. Season with salt and pepper.

Let the carrots and potatoes cool slightly, then toss with the pesto and serve.

Pictured: Glasbake Vegetable Medley J2024 Rectangular Baking Dish, Pyrex Spring Blossom 043 Oval Casserole

Pickle & Cheese Party Spread

This pickle-infused cheese spread was inspired by the old-fashioned cheese ball — and more specifically, this dill pickle cheese ball from Delish. I’ve modified the recipe slightly to serve in a casserole dish — because while cheese balls are retro cool, Pyrex is prettier.

The recipe makes enough for a party; for a smaller group, a half batch will do. Note: I made the bacon optional because while it’s visually appealing, I don’t think it adds that much to the flavor of the spread. The bacon loses its crunch pretty quickly in the refrigerator, so if you’re making the dish ahead of time, it may be better to omit.

Ingredients

2 8-oz blocks cream cheese
1 1/2 cups sharp cheddar cheese, shredded
1 cup mozzarella, shredded
3 tbsp fresh dill, chopped fine
1 tsp garlic powder
1 tsp paprika
1/2 cup dill pickles, chopped fine (about 3 whole baby dills)
1 tbsp pickle juice
salt
pepper
6-8 slices cooked bacon, chopped fine (optional)

Set cream cheese out to bring to room temperature. If desired, chop the cheddar and mozzarella into finer pieces.

In a large bowl, combine 1 cup of the cheddar with the mozzarella, garlic powder, paprika and 1 tbsp of the dill, and stir until mixed. Stir in the pickles and pickle juice. Add the cream cheese and stir until thoroughly incorporated. Season to taste with salt and pepper.

Spoon the mixture into a small casserole dish and spread around in an even layer. Refrigerate for at least 2 hours.

For the topping, combine the bacon with 1/4-1/2 cup cheddar and 1-2 tbsp dill (amount depends on the diameter of your casserole dish — if it’s large like a pie plate, use more; if it’s small like a ramekin, use less). Sprinkle the topping over the spread and serve.

Pictured: Pyrex Spring Blossom 472 Cinderella Round Casserole, Pyrex Spring Blossom 503 Refrigerator Dish, Pyrex Spring Blossom 443 Cinderella Mixing Bowl, Pyrex Spring Blossom 401 Round Mixing Bowl, Corning Ware P-185-B Snack-It Plate

Thanksgiving Dinner 2017

I love cooking for Thanksgiving, but I love planning the cooking even more: looking for recipes, thinking about logistics, choosing the right dishes, coming up with a schedule, etc. I think I like cooking projects more than the cooking itself.

So when I saw this article on The Kitchn about organizing serving dishes for Thanksgiving, I knew I wanted to do something similar. I had already been thinking about setting out my vintage cookware in preparation for the big day, but now I needed to take pictures.

I think this will be a new tradition for me, documenting the mix of dishes I use for holiday meals. For this Thanksgiving, I am going with a variety of greens and floral designs, drawn from my favorite Pyrex and Corning Ware patterns.

Pictured: Corning Ware Floral Bouquet Third Edition A-3-B Casserole, Corning Ware Floral Bouquet Third Edition P-43-B Petite Pan, Fire King Gravy Boat, Pyrex Lime 024 Round Casserole, Pyrex Verde 403 Round Mixing Bowl, Pyrex Spring Blossom 045 Oval Casserole, Pyrex Spring Blossom 043 Oval Casserole, Pyrex Spring Blossom 72 Butter Dish, Pyrex Spring Blossom Pitcher

Free Printable Thanksgiving Menu

Inspired by Fire King’s Gingham Garden pattern, this printable menu template will bring some vintage charm to your Thanksgiving table. The text is editable so you can add, subtract or change categories as needed. Here’s a closer look with and without menu items (yes, that’s pretty much our actual Thanksgiving menu this year — no turkey!):

Download the Word document here: Thrifted Kitchen Thanksgiving Menu Template. Enjoy!

Pictured: Pyrex Woodland 77 Gravy Server with Saucer

Thrifted Find: Salton Cosmopolitan Casserole

Straight out of 1973, the Salton Cosmopolitan Casserole was the product of a collaboration between Salton Inc. and Corning Glass Works. The dish was sometimes stamped Salton and sometimes Pyrex (mine, which I scored from Goodwill online, says Salton), but it’s clearly made from a Pyrex mold — the 475 Cinderella Round Casserole. There are some interesting details about the history of Salton and Pyrex on the Corning Museum of Glass Pyrex Potluck site here.

The casserole was originally sold as a set with a square electric hot plate — you can see a photo from the Corning Museum of Glass collection here. In fact, the Salton company was primarily known for its hot plates, food warmers and other small appliances. My research into the subject brought back a childhood memory of a Salton electric bun warmer my parents used to bring out for keeping muffins and biscuits hot at the breakfast table. It was a sort of rectangular box with curved sides and a cloth-covered, hinged lid. It seems that various versions of it can be had on eBay for about $30, but I will hold out for the brown polka dot design I remember.

In addition to the bun warmer discovery, I came across a charming 1975 New York Times article about company founder Lewis Salton:

And wouldn’t you have it, the Salton peanut butter machine is available on eBay too! Luckily for my sanity and cabinet space, I’m not into collecting appliances. But if I see that bun warmer in a thrift store someday, I’m not making any promises.


Chicken, Sausage and Rice Gumbo with Collard Greens

I hesitate to call this dish gumbo because the term is so loaded with a specific food culture. My version is probably not “authentic” — but it’s delicious and hey, I can make gumbo however I want! I think of it sort of as a gumbo soup — hearty but not too thick in the broth department, full of Cajun flavors and with rice and greens mixed right in.

The spice level here is medium to hot — to me that’s zesty but not mouth-on-fire hot. You could cut the red pepper flakes to go milder, or add cayenne to go hotter. Also, if you prefer a thicker stew, you could double the butter and flour.

Serves 8-10

Ingredients

1 lb andouille sausage, sliced
2 tbsp butter
1/4 cup all-purpose flour
1 medium onion, chopped
1 medium green bell pepper, diced
3 celery stalks, chopped
3 carrots, chopped
3 cloves garlic, minced
2 14 1/2-oz cans diced tomatoes (undrained)
6 cups low-sodium chicken broth
1 tbsp dried thyme
1 tsp red pepper flakes
1 tsp smoked paprika
2 bay leaves
1 1/2 lbs boneless skinless chicken breasts
2 10-oz bags cleaned and cut collard greens
4 cups cooked brown rice
2 tsp ground gumbo file
salt to taste

In a large dutch oven, saute the sausage over medium heat until browned and the fat begins to render. Remove the sausage and set aside, leaving the drippings in the pan.

Lower the heat slightly, add the butter and stir until melted. Sprinkle in the flour and stir with a whisk until incorporated. Continue stirring constantly and cook until caramel in color, about 15-20 minutes (actual time can vary quite a bit; let the roux get as dark as you want, being careful not to burn).

Add the onions, bell peppers, carrots, celery and garlic and stir until coated in the roux. Add the diced tomatoes and deglaze, scraping up and stirring in the browned bits on the bottom of the pan. Add chicken broth, thyme, red pepper flakes, smoked paprika and bay leaves. Bring to a boil.

Add the chicken and lower to a simmer. Cover and cook until the chicken is no longer pink in the middle, about 20 minutes. Remove chicken and shred or chop into small pieces, set aside.

Add the collard greens and stir until wilted. Cover and simmer until the greens are tender, about 40 minutes.

Add the gumbo file, sausage, chicken, rice and salt and simmer for a minute, then serve.

Pictured: Pyrex Spring Blossom 443 Cinderella Mixing Bowl, Corning Ware Floral Bouquet Third Edition P-43-B Petite Pan, Corning Ware Wildflower P-43-B Petite Pan, Corning Ware Fresh Cut P-43-B Petite Pan, Corning Ware Fruit Basket P-43-B Petite Pan 


Best Pyrex Stacking Ideas

Vintage Pyrex is so pretty, it’s a shame to store it inside a kitchen cabinet. Instead, collectors often arrange their wares on open shelves, carts or hutches using a technique designed to show off each individual piece: stacking.

My own stacking preference is a mix of form and function: I want to be able to see and enjoy the patterns and colors, but I also want easy access so that the items in my collection are actually usable for cooking. So, precarious towers of Pyrex are not my thing. Another consideration: preventing rattles and other noises.

One fun thing about stacking is that it gives you an opportunity to mix and match complementary pieces. Recently I finally acquired enough round mixing bowls to put together my own custom set: (from top to bottom) Spring Blossom (x2), Spring Blossom 2, Verde.

img_2246

Since the mixers are nested bowls, you need a little something between each one to lift it up and make the pattern visible (I used folded sheets of bubble wrap). There are lots of ways to do this for different sizes and shapes of Pyrex, so here I have gathered the best ideas I’ve seen on the internet, on social media and in collector groups:

  • packing peanuts
  • bubble wrap
  • Ziplock containers
  • ramekins
  • bags of rice, beans, popcorn, etc.
  • empty packing tape rolls
  • inverted lids
  • glass tumblers
  • cheap plastic bowls
  • Jell-O boxes
  • chunks of lumber
  • slices of pool noodles
  • tuna cans (or similar)
  • berry baskets
  • paper bowls
  • small plastic food containers (e.g., sour cream, margarine, yogurt, deli containers)
  • cut up egg containers
  • squares of non-skid rug protector (for stability)
  • styrofoam blocks
  • floral foam blocks
  • old washclothes
  • canning rings
  • plastic coffee cup lids

Of course, these methods can work for any kind of vintage kitchenware, not just Pyrex. Corning Ware, for example, stacks really easily on inverted lids. Over the weekend we installed some new shelves to house my collection, so stacking all kinds of dishes has been on my mind.

Whole Wheat Buttermilk Cornbread

With Thanksgiving around the corner, I’ve been thinking about cornbread — and more specifically, cornbread stuffing. Cook’s Illustrated has a great cornbread stuffing recipe that I tried a few years ago, and this time around I’m curious about making a whole wheat version. My first step: testing out a whole wheat cornbread recipe.

The whole wheat flour gives this cornbread an earthiness that’s especially tasty topped with good local honey. I’ll definitely be making it again for cornbread stuffing next month.

Adapted from Cook’s Illustrated‘s Golden Cornbread for Stuffing (The New Best Recipe, America’s Test Kitchen 2004)

Ingredients

3 eggs
1 cup buttermilk
1 cup milk
1 1/2 cups yellow cornmeal
1 1/2 cups whole wheat flour
1 tbsp baking powder
3/4 tsp baking soda
4 tsp sugar
3/4 tsp salt
3 tbsp unsalted butter, melted

Preheat oven to 375 degrees. Grease a 13×9 baking dish (or equivalent — I used two 8-inch square dishes).

Whisk together dry ingredients in a large bowl. Whisk eggs, buttermilk and milk in a separate bowl. Pour the egg/milk mixture into the dry ingredients and stir until just combined. Stir in melted butter.

Pour the batter into the baking dish and bake until the top is cracked and golden and edges are pulling away from the sides, about 30-40 minutes.

Place the baking dish on a wire rack to cool for at least 1 hour before serving.

Pictured: Corning Ware Floral Bouquet Third Edition A-2-B Casserole (x2), Corning Ware Spice O’ Life P-81-B Menuette Saucepan, Pyrex 532 Measuring Cup, Pyrex Butterfly Gold 404 Round Mixing Bowl

Fool-Proof Beef Pot Roast with Bacon and Mushrooms

This is the moistest, tenderest, most flavorful pot roast I’ve ever made. It’s a little bit time-consuming, but well worth it for the end result! There are a few things I think make this recipe work so well: 1) Bacon provides smoke, salt and richness that really enhance the dish. 2) Dried mushrooms pack an intense punch for even more flavor. 3) Using two small roasts instead of one big one, and trussing them — this is something Cook’s Illustrated recommends, because it promotes even cooking. 4) Patience — don’t try to rush the cooking time.

I call this fool-proof because I messed up a lot of things along the way and it still came out great. First off, I chose a pot that was too small, because I was determined to use my Corning Ware, so I had to scoop out a bunch of the cooking liquid and cram the meat in sideways. Also I’m terrible at trussing, so it was starting to fall apart at the end. Most pot roast recipes recommend searing the roasts before cooking, but I didn’t bother, because they’re unwieldy and I always end up splashing myself with oil and I hate that step. And I miscalculated my prep time, so by the time I got the whole thing in the oven, dinnertime would have been pushed back to 9 p.m. (way too late for my 5-year-old). My husband whipped up some barbecued chicken as a plan B, and I stewed about not being able to eat the dish I’d been slaving over. Thankfully, pot roast tastes even better reheated the next day (more on that in the recipe below), so after it finished cooking, I let it cool a bit and then put it in the refrigerator and went to bed.

Adapted from Cook’s Illustrated‘s Italian-Style Pot Roast.

Serves 8

Ingredients

8 oz bacon, snipped into 1/2-inch pieces
2 medium onions, chopped
4 medium carrots, peeled and chopped
3 celery ribs, chopped
6 garlic cloves, sliced
1 1/2 cups red wine
2 tbsp tomato paste
2 14 1/2-oz cans diced tomatoes, drained
2 cups low-sodium beef broth
2 cups low-sodium chicken broth
1/2 oz dried mushrooms (porcini and/or others)
1/2 tsp red pepper flakes
2 tsp dried oregano leaves
2 bay leaves
2 3-lb boneless beef chuck roasts
salt and pepper

Preheat oven to 300 degrees.

In a large (at least 6-quart size) oven-safe pot, saute bacon over medium heat until fat has rendered and edges are starting to brown. Spoon out excess grease, reserving about 1 tbsp. Add onions, carrots and celery and cook until translucent, about 5 minutes. Add garlic and cook another 1 minute.

Add wine, tomato paste, diced tomatoes, mushrooms, red pepper flakes, oregano and bay leaves. Combine broths in a separate bowl.

Truss each roast tightly with kitchen twine. It doesn’t have to be pretty — you just want each roast to hold together in a roughly uniform shape while cooking. Season the roasts with salt and pepper, then nestle in the pot and pour in enough broth so that the meat is partially submerged. Bring to a boil.

Cover and bake for 3 1/2-4 hours, turning the meat at the halfway point. The roasts should be fork tender and falling apart. Remove the meat from the cooking liquid and let rest, covered with foil, for about 20 minutes.

(At this point you can return the meat to the pot and refrigerate overnight, if desired. This actually makes the next step a lot easier — skimming off the fat. In the fridge, the fat solidifies in a layer on top, which can be chipped away with a spoon. Then you can reheat the roast on the stove top.)

Set the (hot or reheated) meat aside. After skimming the fat from the surface, bring the cooking liquid to a boil and simmer to reduce a little into a sauce, about 30 minutes. You can use it as is or blend it with an immersion blender for a thick, rich sauce.

Slice the meat across the grain and pour a liberal amount of sauce on top. You might want more sauce in a gravy boat at the table. I actually ate spoonfuls of sauce by itself, it was so good!

Pictured: Corning Ware Spice O’ Life A-5-B Saucepot; Corning Ware Blue Cornflower P-332 Roaster; Pyrex Spring Blossom 2 403 Round Mixing Bowl; Pyrex Town and Country 501 Refrigerator Dish